PCOS Bites discusses the pillars of good nutrition offering tools and strategies to improve your daily eating. We do not prescribe diets for individuals who have PCOS. Always do your own research before consuming any food, supplement, or product.
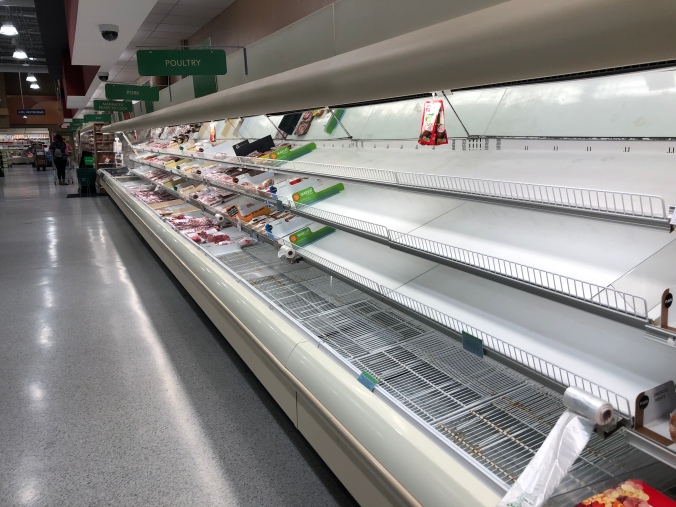
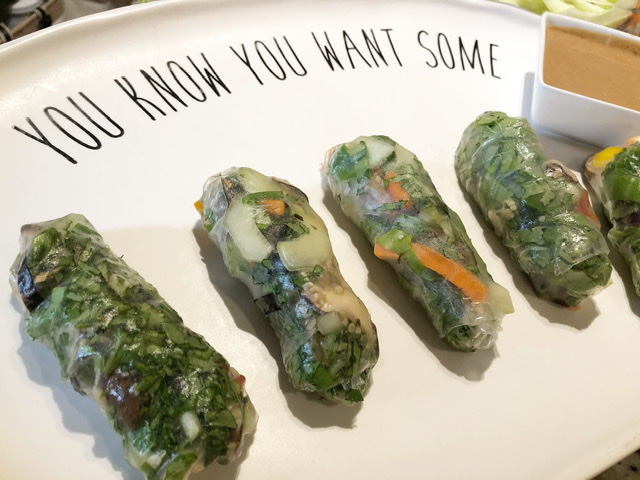
I was a little taken aback at how the meat section and paper aisles were just stripped bare at only 10 am on a Tuesday morning at our local grocery store as part of the CoronaVirus Crisis. Our store was limiting all purchases to only two items of each. That’s a bit difficult to say the least when you’re responsible for feeding seven people! Thankfully, this store run was to get some meds for my husband and as I waited for it to be ready I figured I’d grab some fresh produce for these yummy Mushroom-Cucumber-Lettuce-Carrot-Bell Pepper Rolls. For the first time, I actually felt relief about my decision to eat more veggies because that meant the produce section was more full for me and my family to shop from!
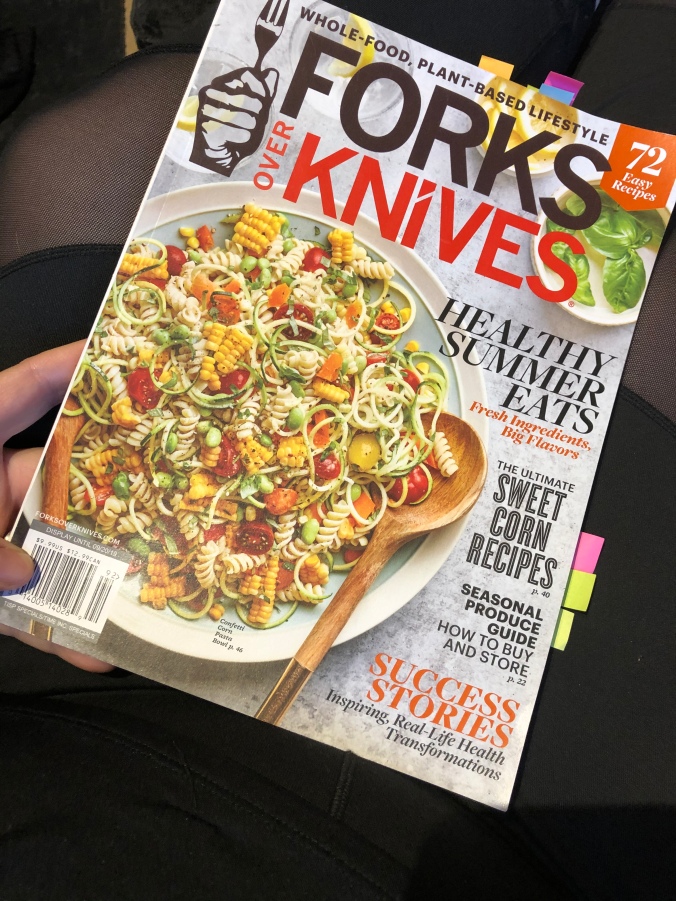
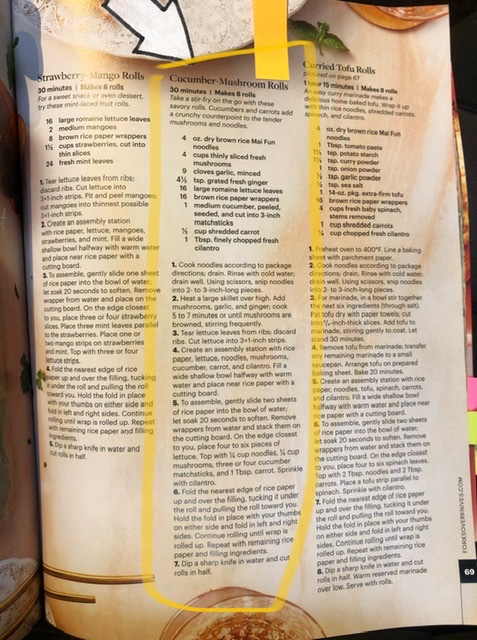
If you haven’t checked out the Forks Over Knives Recipes, you may want to take a gander online. There’s a movie documentary (watch online/rent/buy) that you can watch, a cookbook or can purchase as a reference for your kitchen library, and these great seasonal magazines (Spring 2020, Winter 2020) full of recipes as well as stories of those who have forever changed their lives by eating whole-based greens, fruits, and veggies while ditching gluten, dairy and sugar.
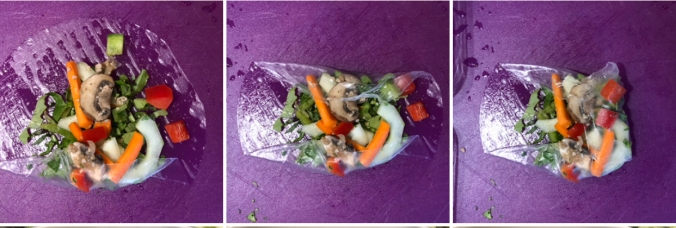
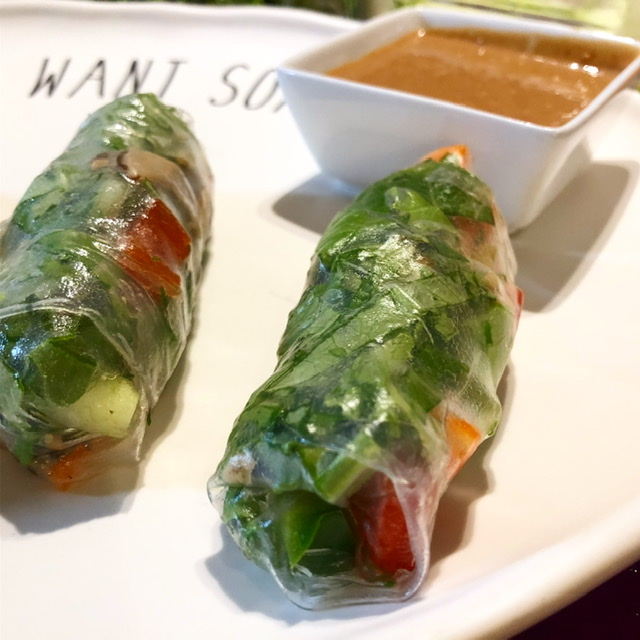
I made the Cucumber-Mushroom Rolls without the dry brown rice Mai Fun Noodles and added some sweet bell peppers I had on hand. This is the first time I’ve ever played around with these round rice papers. Couple of first-timer tips if I may… dip it for about 7-10 seconds and take it out while it’s still slightly stiff. I diced up the lettuce (from a medley kit because my Tower Garden romaine wasn’t quite ready — but will be soon!) and put all the components each in a small bowl and just sat there and did assembly-line style. The thing that took the longest was simply cutting the veggies. This is a seriously easy thing to make in my opinion.
When folding your rice paper, fold sides first (left, then right) and then fold the bottom flap up to seal the corner before rolling the goods into the rice paper. There is a little bit of stretch. I used the peanut dipping sauce recipe on the back of my rice paper because it was free of any gluten and sugar. (I drizzled onto the top as I ate instead of dipping.)
This is definitely going to go into my spring/summer meal plan wheel-house, because it won’t heat up my kitchen by turning on the stove. I do encourage you to pick up a copy of the Forks Over Knives Summer 2019 Edition as it contains many more great recipes like this one!
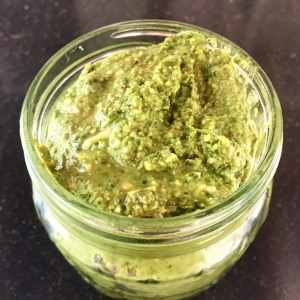
If you’re not used to eating greens, pesto can especially be a great place to start. This recipe tastes traditional, but sneaks in foods you might not otherwise pair together in a pesto. And as you know, no recipe placed on PCOSbites goes without getting personally tested and approved. Even my five kids loved this!
A couple of things to know about why you should eat this…
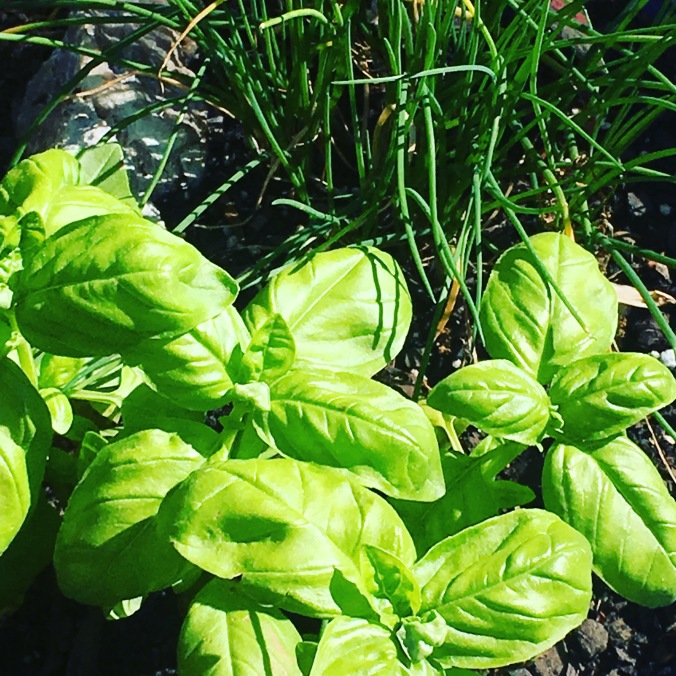
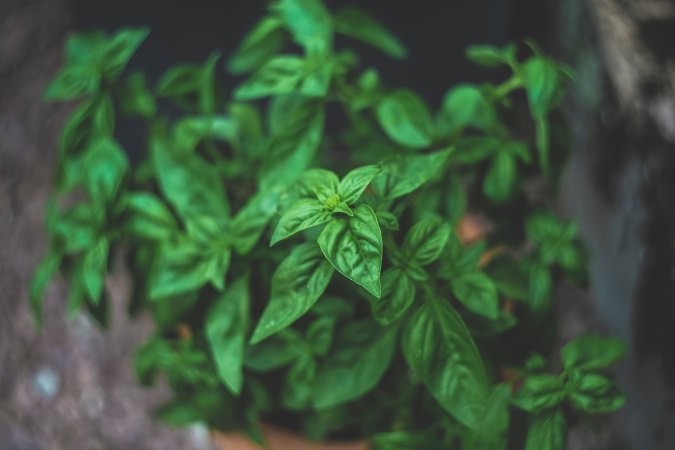
Basil is rich in Vitamin K as well as other vitamins and minerals including iron, calcium, manganese, magnesium, vitamin C and potassium (see chart below). Basil also has antibacterial properties and contains DNA-protecting flavonoids making it a power food for helping your body’s cells do their job!Basil is the main foundation to the pesto, so you will want it as fresh as possible. We encourage you to grow your own in either a pot with soil or in a Tower Garden off your back deck/inside your house. (We’ve especially have found basil to grow well in the hydroponic/aeroponic systems, like the Tower Garden!) Basil germinates within 8-14 days from seed and is ready to start harvesting as soon as 3 weeks. This is a staple plant in our home — we always have basil growing. If you’re not familiar with how to grow basil, check out our helpful tips on growyourhealthgardening.com
1 cup of chopped basil has:
Nutrient Quantity
Vitamin A 1477 IU
Vitamin C 5 mg
Vitamin E 0.2 mg
Vitamin K 116 mcg
Folate 19 mcg
Choline 3.2 mcg
Calcium 49.6 mg
Magnesium 17.9 mg
Potassium 82.6 mg
Phosphorus 15.7 mg
Iron 0.9 mg
Sodium 1.1 mg
Watercress (or also referred to sometimes as Upland Cress) is a peppery flavored green and is chalk-full of vitamin A, vitamin B6, vitamin B12, calcium, phosphorus, iron, and magnesium, all of which benefit the body. Watercress is also known for lowering blood pressure, improving thyroid gland function, increases diuresis (which efficiently eliminates toxins from the whole body), and improving weight-loss. Watercress also has an antioxidant known as alpha-lipoic acid meaning it will lower glucose levels, prevent changes brought on by oxidative stress, and increase insulin sensitivity. In short, you want to eat this green whenever possible — add it to salads, incorporate it into soups, sauces, casseroles, or even a little bit of gluten-free pasta. We’ve included it in this recipe in place of black pepper and encourage you to think of using it the same way in other dishes!1 cup of chopped watercress has: Nutrient Quantity
Vitamin A 1085 IU
Vitamin C 6 mg
Niacin 1 mg
Folate 1 mcg
Vitamin K 0 mcg
Calcium 8 mg
Magnesium 1 mg
Phosphorus 4 mg
Sodium 9 mg
Hemp heart seeds are rich in healthy fats and essential fatty acids. They are also a great protein source and contain high amounts of vitamin E, phosphorus, potassium, sodium, magnesium, sulfur, calcium, iron and zinc. You can purchase this in powder form making it a great addition to your pesto and increasing your protein intake. Further, if you suffer from PMS symptoms and painful cycles, research has found that the Gamma-linolenic acid (GLA), found in hemp seeds, produces prostaglandin E1, which reduces the effects of prolactin. If you aren’t keen on using hemp heart seeds, simply substitute another plant-based protein powder.
Why do we use pumpkin seeds, walnuts and almonds instead of the traditional pine nuts? For one, they are less expensive and secondly, these three nuts are rich in omega-3 and omega-6 fatty acids, antioxidants, and fiber. In fact, pumpkin seeds have been found to aid in managing insulin levels and even improve blood pressure.
Swerve can also be used as a straight swap for sugar to sweeten drinks such as coffee and tea. Erythritol is absorbed in the small intestine and then eliminated by the body, so it’s never metabolized and can’t contribute calories to the diet. Some do get stomach cramps from erythritol, so listen to your body and adjust as needed. If you’re not keen on taking a sugar-alcohol (erythritol), simply swap this element with the same measurement of natural honey. It’s not a deal-breaker for still making this a healthy recipe if you opt for honey in leu of Swerve.
Once you’ve made your pesto, you can place a spoonful on a piece of chicken breast for a yummy lunch or dinner. Store up to one week in refrigerator. For long-term storage, place in freezer-safe container and remove any air and store in freezer for up to one year. When you’re ready to use, simply take out and thaw. For portion-control pesto, pour into a ice tray and then pop out when frozen and place into a freezer bag (remove as much air as possible.) Don’t forget to note the date that you made your pesto!
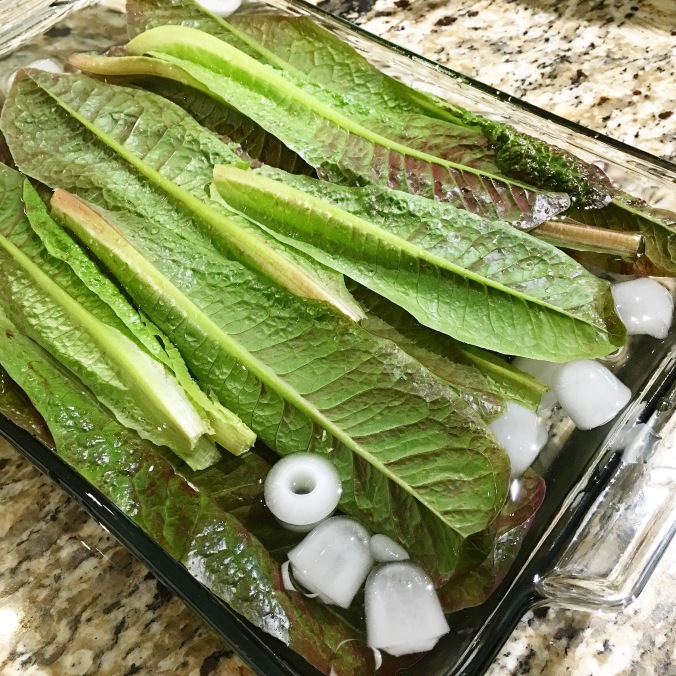
Make an ice bath and add 1 TBSP of Apple Cider Vinegar. Take bowl to where your basil and watercress are growing.
Harvest 3 cups of loose basil leaves from your personal Tower Garden. To harvest, take a sharp pair of clean pruning scissors and cut about 1/4″ above two leaves. Remove leaves from stem and place basil leaves immediately into ice bath after cutting. Leave in ice bath for about 10-15 minutes. Place basil leaves in salad spinner and spin until all water droplets have been removed. Put in a ziplock bag and set aside in refrigerator until you’re ready to make your pesto.
Harvest 1/2 cup of loose greens of Upland Cress or Watercress from your personal Tower Garden. To harvest, take a sharp pair of clean pruning scissors and cut about 1/4″ from base of plant. Leave some leaves in plant to encourage further growth. Remove leaves from stem and place Watercress leaves immediately into ice bath after cutting. Leave in ice bath for about 10-15 minutes. Place watercress leaves in salad spinner and spin until all water droplets have been removed. Put in a Ziplock storage bag and set aside in refrigerator until you’re ready to make your pesto.
After your greens have been cleaned and water removed, you can begin to make your pesto. Take your blender and add the ingredients listed above.
Blend on low speed at first and then scrape down sides down as needed.
Increase blend speed until on high and all ingredients have been well macerated and combined. I usually blend for around a minute.
Pour pesto mix into a refrigerator safe storage container and place lid on top. Store up to one week in refrigerator. For long-term storage, place in freezer-safe container and remove any air and store in freezer for up to one year. When you’re ready to use, simply take out and thaw.
When you’re ready to use your fresh pesto, simply scoop desired amount — remember a little goes along way! Enjoy!!!
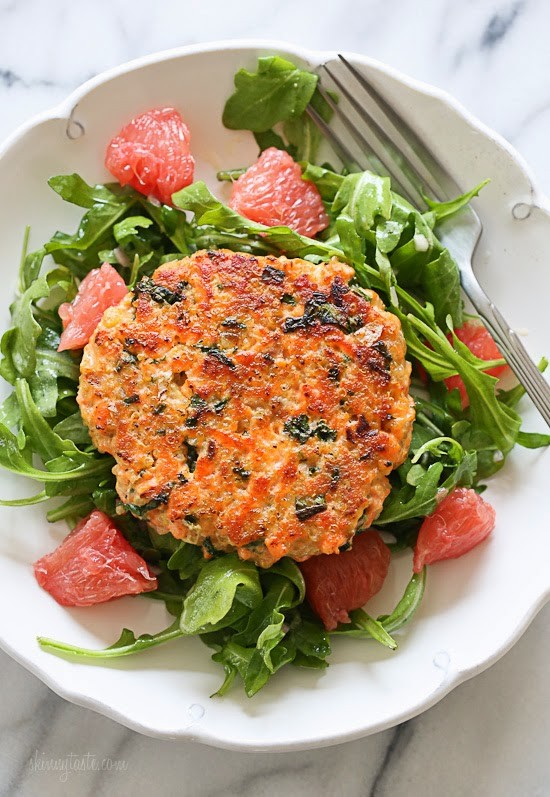
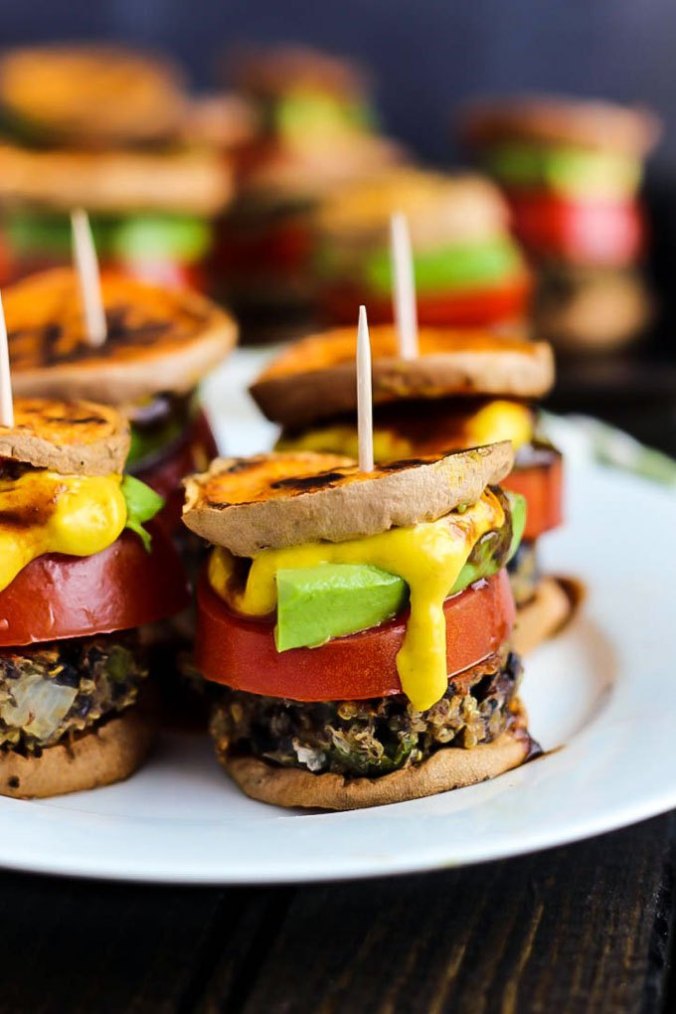
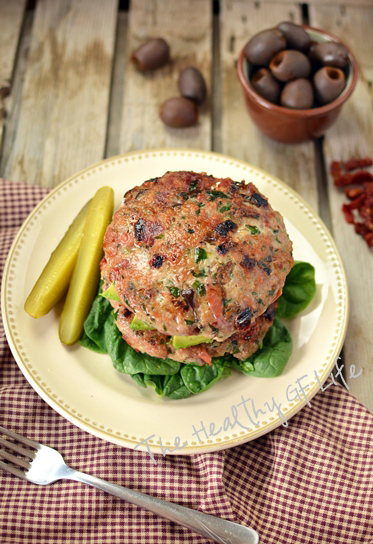
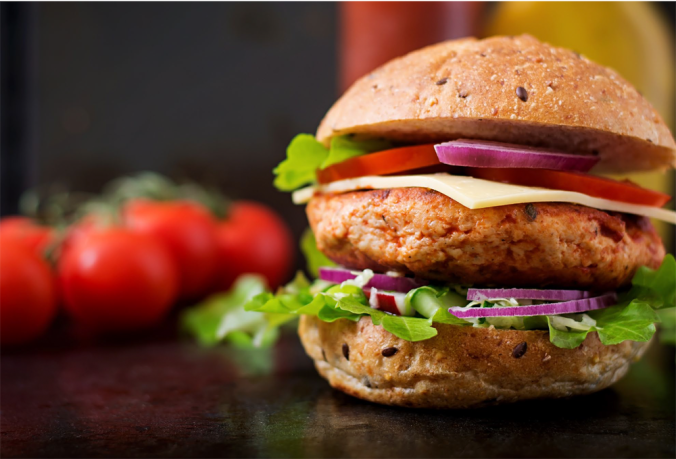
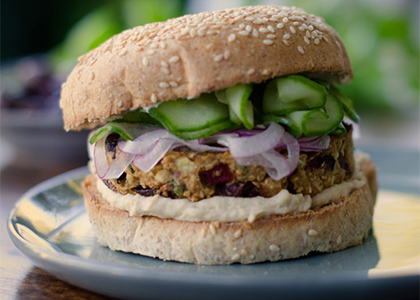
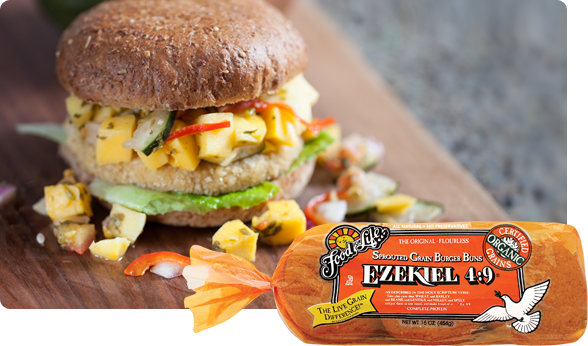
Summer is here and it’s time to fire up your grill! Here are five PCOS-friendly burgers to enjoy! Remember, gluten-free is the best option. Put your burger on a full bed of lettuce and enjoy with a fork or spoon. If you need to have something for a bun experience, check out the sprouted grain version of the Ezekiel Bread Hamburger Buns!
There’s something about eating a flower from a healthy plant that just makes you want to smile. It’s yellow, warmed and grown by the sun and will make you want to draw a big ol’ yellow smiley face as you proudly put GOOD nourishing food in your body. It’s been about 6 weeks since I planted my broccoli starts into the garden. I purchased six small tender plants and they are beginning to produce their first crop. I meant to get out two days ago to trim the floret heads that were forming (they were so little and cute), but the busyness of life got in the way and as I looked out at our little garden this morning I saw that about four plants had started to bloom — those yellow flowers were like a neon sign saying, “We’re ready! Hurry! Come pick us before we are gone!” So out with the scissors I went and just trimmed the stalk right above where new growth shoots were already forming. The great thing about broccoli is that you can get several cuttings off of one plant in one season. And I didn’t realize at first that you can eat not only the broccoli florets, but the leaves and when it is at the flower stage as well.
Did you know that Broccoli is a good source of Protein, Vitamin E (Alpha Tocopherol), Thiamin, Riboflavin, Pantothenic Acid, Calcium, Iron, Magnesium, Phosphorus and Selenium, and a very good source of Dietary Fiber, Vitamin A, Vitamin C, Vitamin K, Vitamin B6, Folate, Potassium and Manganese. I can just hear you saying, “Okay, great Erin. But translate that into how that helps me with my PCOS.” Women with PCOS typically have inflammation issues going on in their body and are at higher risk for ovarian cancer. This is where what you put into your mouth really matters — your liver and cells are counting on you to eat a food like this because it has (big word warning) isothiocyanates (also referred to as ITCs). ITCs are compounds that actually help shut down inflammation responses in the body. unique combination of antioxidant, anti-inflammatory, and pro-detoxification components in broccoli make it a unique food in terms of cancer prevention. What’s more, broccoli is also a rich source of one particular phytonutrient (a flavonol) called kaempferol. Especially inside of our digestive tract, kaempferol has the ability to lessen the impact of allergy-related substances (by lowering the immune system’s production of IgE-antibodies). By lessening the impact of allergy-related substances, the kaempferol in broccoli can help lower our risk of chronic inflammation. In fact, if you eat only an average of 1/2 cup of broccoli per day—only 22 calories’ worth of broccoli—scientists have shown it will have some measurable benefits.
I know there might be some of you out there that were once like me and digging in your heels saying, “I don’t like vegetables!” Well, my dear cyster, this is what helped me change my thinking when I put it in context… which is worse, enjoying some crunchy green stuff on top of your salad or going thru chemo treatments? Harsh maybe, but if you have weight around your middle, this message is for you as you most likely have inflammation happening inside your body. Just because you can’t see it, doesn’t mean it’s not happening. I’m here to coax you out of denial so that you can change your life one bite at a time. When you reason it out, the choice seems really clear — eat broccoli. Raw or cooked, it needs to get in your tummy to nourish your body. (Note: if cooking, steam at temperature of 212°F (100°C), with a cooking times of 5 minutes at the most for optimal nourishment.)
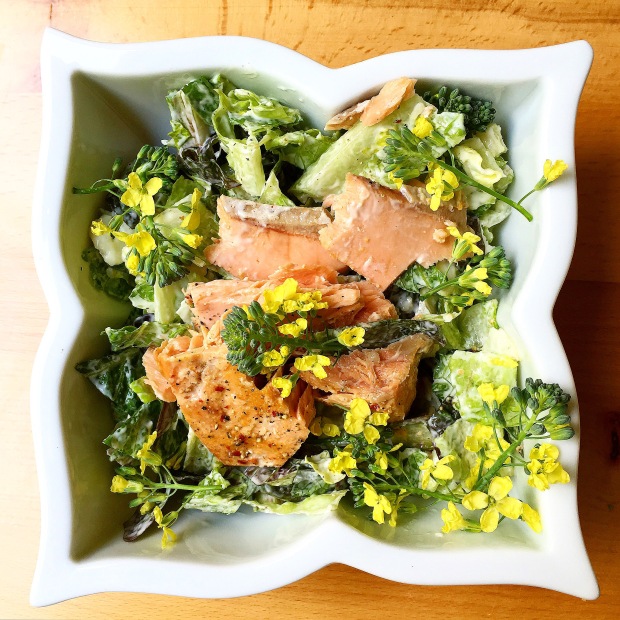
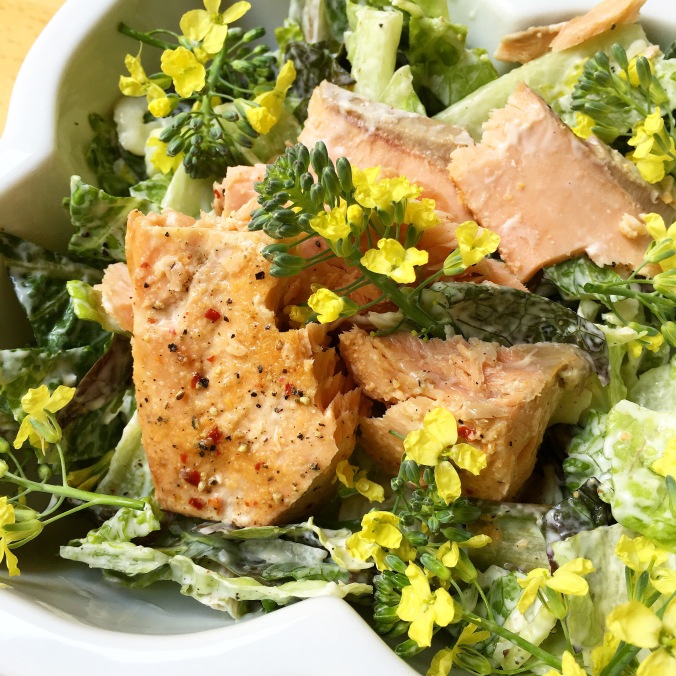
But enough about wonderful broccoli — let’s get back to what’s for lunch … today we put together a simple Caesar Salad with romaine picked fresh from the garden this morning, freshly grated Parmesan flakes (low to almost no lactose), and salmon (leftover from dinner the night before.) I was reminded that I had harvested those pretty blooming broccoli florets (they were still soaking in a ice bath on the counter) and threw the broccoli florets with flowers on top as a crunching vitamin packed topping! It looks so pretty I wish you could see it in person! And the flavors were fantastic!
Tip: When you harvest lettuce of any type, take your cuttings early in the morning when it is still cool out and then water your plant and place your cuttings into a bath of ice water with some organic apple cider vinegar. The vinegar did flush out a little spider that was hiding in my romaine, so it’s always a good idea to wash your cuttings outside.
Salmon is an excellent source of vitamin B12, vitamin D, and selenium. It is a good source of niacin, omega-3 fatty acids, protein, phosphorus, and vitamin B6. It is also a good source of choline, pantothenic acid, biotin, and potassium. It’s also a food that will fight inflammation in the body, so try to eat Salmon about 2x a week (easy if you do a dinner one night and then left overs another time at either lunch or dinner.)
In short, eat this! It’s tasty and good for the cells and organs in your body! 👏💗👍
If you are consuming less than 5 cups of salad a day, your body may be under-nourished. Did you know that we need about 4,700 mg per day of Potassium to run the body for someone who is 200 lbs. Take for instance a banana; one banana is 300 mg. You’d have to eat a lot of bananas to even begin to reach that 4,700 mg per day nutritional need within your body and the sugar (converted from the carbs in banana) would be a problem as well. The power house to help you feel your best? Salad!
You need approximately 7-10 cups of salad per day to fuel the cells in your body. And the heavier you are, the more greens you need per day to nourish your body. The good news is that salad is easy for your body to digest. One for lunch and one for dinner and you’ve nourished your body for the day.
Keep in mind as well that not only the quantity of how much salad you eat matters, but it also depends on the quality of the vegetable. Ice berg lettuce, for example, will not have as much nutritional value compared to something high-density like:
• Kale – Kale is packed full of vitamins A, C, and K. While slightly higher in calories than other greens, kale also provides a dose of vitamins B6-B1-B2-B3, manganese, iron, calcium, copper, magnesium, and potassium, making for a nutrient-packed salad. It also contains 3x times more lutein and zeaxanthin than spinach.
• Spinach – Spinach is packed with vitamin A and a great source of vitamins C and K, iron, and fiber. It also contains more folic acid than most salad greens, which helps convert the food you eat into energy and produces healthy red blood cells. Recent research also suggest compounds in the leaf membranes called thylakoids may serve as a powerful appetite suppressant. A recently published long-term study at Lund University in Sweden found that having a drink containing thylakoids before breakfast could significantly reduce cravings and promote weight loss. On average, the women who took the spinach extract lost 5.5 pounds more than the placebo group over the course of three months.
• Swiss Chard – Swiss Chard, a relative of the beet family, tastes similar to spinach. It is higher in sodium count than other salad greens (with 77 grams per cup), but it’s loaded with vitamins A, C, and K, and also provides some iron and calcium. Consider combining chard with a few other greens to make your own mix. Recent research has shown that these powerhouse leaves contain at least 13 different polyphenol antioxidants, including anthocyanins–anti-inflammatory compounds that could offer protection from type 2 diabetes. Researchers from the University of East Anglia analyzed questionnaires and blood samples of about 2,000 people and found that those with the highest dietary intakes of anthocyanins had lower insulin resistance and better blood glucose regulation.
• Watercress – It’s more nutrient-rich than romaine and leaf lettuce, containing almost all of the daily recommended intake for vitamins A and K, and half the daily recommendation for Vitamin C, in a 2.5 cup serving. Gram for gram this mild-tasting and flowery-looking green contains four times more beta carotene than an apple, and a whopping 238 percent of your daily recommended dose of vitamin K per 100 grams—two compounds that keep skin dewy and youthful. The beauty food is also the richest dietary source of PEITC (phenylethyl isothiocyanate), which research suggests can fight cancer. Results from an eight-week trial published in the American Journal of Clinical Nutritionsuggest daily supplementation of 85 grams of raw watercress (that’s about two cups) could reduce DMA damage linked to cancer by 17 percent. Exposure to heat may inactivate PEITC, so it’s best to enjoy watercress raw in salads, cold-pressed juices, and sandwiches.
• Parsley – Parsley is a quiet superfood, so packed with nutrients that even that one sprig can go a long way toward meeting your daily requirement for vitamin K. Moreover, research suggests the summer-y aroma and flavor of chopped parsley may help control your appetite.
• Romaine Lettuce – Romaine is rich in vitamins A and K, but it isn’t quite a mineral powerhouse. Be sure to mix it with some spinach or kale to pack in more antioxidants, or opt for a pre-mixed blend. packs high levels of folic acid, a water-soluble form of Vitamin B that’s proven to boost male fertility. A study published in the journal Fertility and Sterility found supplemental folic acid to significantly increase sperm counts. Folate also plays a role in battling depression — something women suffering with PCOS may be familiar.
• Red and Green Leaf Lettuce – It has a mild taste, making it a good choice for getting vitamins A and K into the diet of children and picky eaters.
• Butter/Bib/Boston Lettuce – Butter lettuce is low in sodium, a good source of vitamin A, and has small amounts of iron and calcium.
• Arugula – It’s a tasty choice with some vitamin A, vitamin C, iron, and calcium. Mix arugula with more nutrient-dense options to pump up the flavor and the antioxidant power of your salad.
• Chicory/Radicchio – A study in the Journal of Nutrition found that people who consume 650 mg a day of polyphenols have a 30 percent chance at living longer than those who consume less than that. A cup of chicory leaves clocks in at about 235 mg (double that of spinach!), so consider adding a little leafy red into your leafy greens.
• Beet Greens – Only 1 cup of the bitter green serves up nearly 5 grams of fiber—that’s more than you’ll find in a bowl of Quaker oats! Researchers at the University of Leeds found that risk of cardiovascular disease was significantly lower for every 7 grams of fiber consumed.
• Chinese Cabbage – Rich sources of highly-available calcium and iron, cruciferous vegetables like the cabbage have the powerful ability to “turn off” inflammation markers thought to promote heart disease. In a study of more than 1,000 Chinese women, published in the Journal of the Academy of Nutrition and Dietetics, those who ate the most cruciferous vegetables (about 1.5 cups per day) had 13 percent less inflammation than those who ate the least.
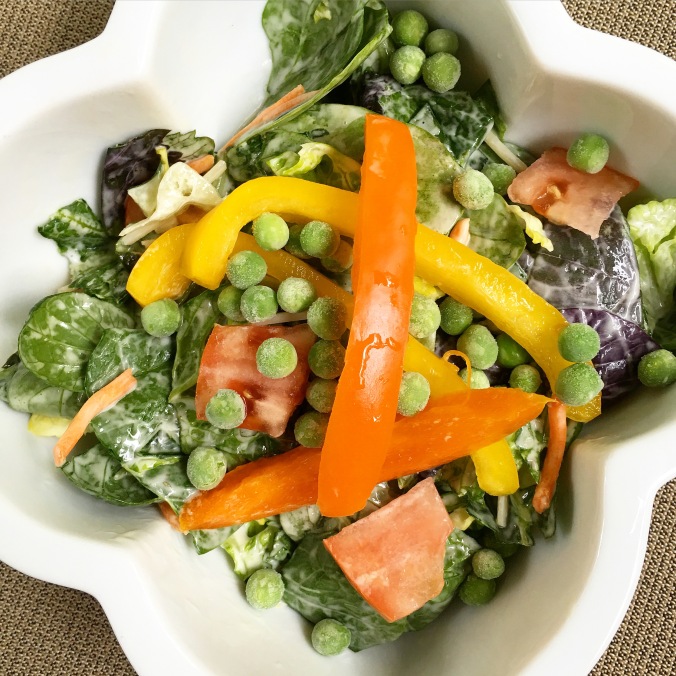
Your goal is to get in the habit of eating salad, because of it’s nutrients for your body just to function. When at the grocery store, look for something like a Spring Salad Mix which is composed of several different plants; Arugula Romain, Spinach, Swiss Chard, Red Mustard, Beet Greens Let your goal be to consume 7-10 cups of salad a day at first and use whatever dressing helps you to begin that habit. Once you are more accustomed to eating your daily salads, work on lowering the sugar in your dressings. It is recommended to have 1 gram of sugar per tablespoon or less. Making your own would be even better.
Tip: If you purchase salad in a plastic container at the grocery store, after you’ve taken out a serving, fluff the leaves and add a couple sheets of dry unused paper towels to absorb extra moisture before putting the lid on and returning to the refrigerator and your salad will last longer.
Avoid Ice-berg lettuce (not very nutrient dense), and toppings like croutons, dairy high in lactose, dried cranberries or raisins, as well as anything with sugar or any nut topping coated in sugar.
Instead, focus on putting these types of things on your salad:
• Did you know that 1 tsp of Sprouts is equal to 50 tsp of broccoli with phytonutrients?! Add sprouts!
• If you add fat to your salad, you will pull more nutrition out of the salad. Use Bacon Bits, Feta, Olives, Olive Oil, nuts and seeds.
• Add protein like a hard-boiled egg or try 1/4 cup of cold cooked quinoa that is rich in protein as a topping as well. Hummus on the side is also a nice mix in to add moisture to the salad without adding extra dressing.
• A light topping of a beneficial fruit to fight inflammation in the body like: pomegranate, strawberries, raspberries, or blueberries.
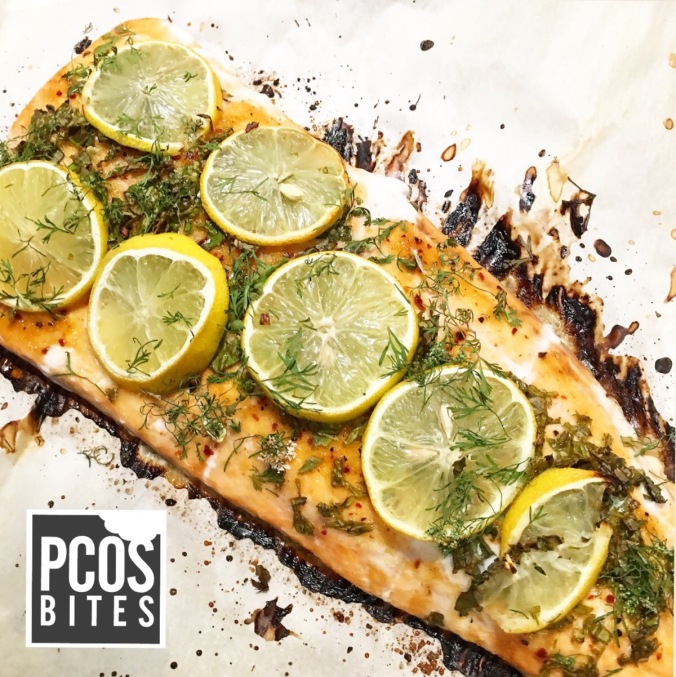
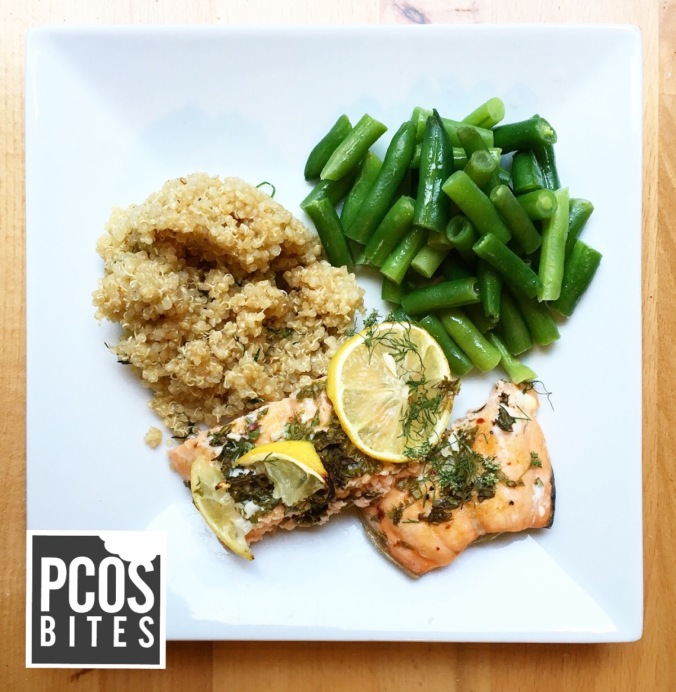
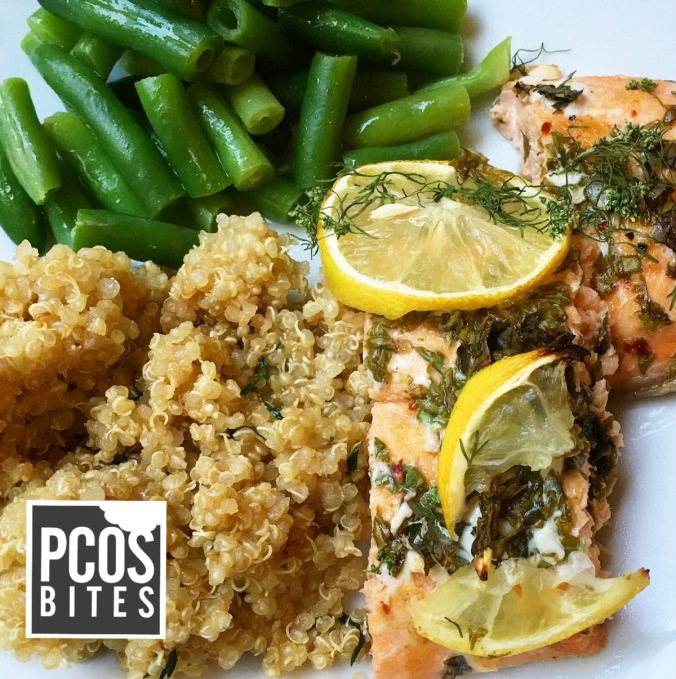
Dinner: Wild Caught Pacific Salmon! We seasoned ours with a little bit of garlic rub, chopped up fresh basil and German basil from the garden, then lemon slices and lemon juice squeezed on top. Takes only 15-20 min to bake depending on size. Yum!
Sides: Cooked green beans and Quinoa seasoned with garlic salt, onion salt, parsley bits, and soy sauce.
Season your salmon (we buy ours frozen so we defrost in hot water for about ten minutes before we apply a basic garlic rub.) Dice up fresh basil (we also had German basil in the garden) to release the oils and flavors of the herbs while the salmon cooks. Slice lemons and place on top. Take the ends of your lemon and squeeze lemon juice onto seasoned meat. Put your salmon on a cookie sheet lined with parchment paper and place in the oven at 425* for 20 min.
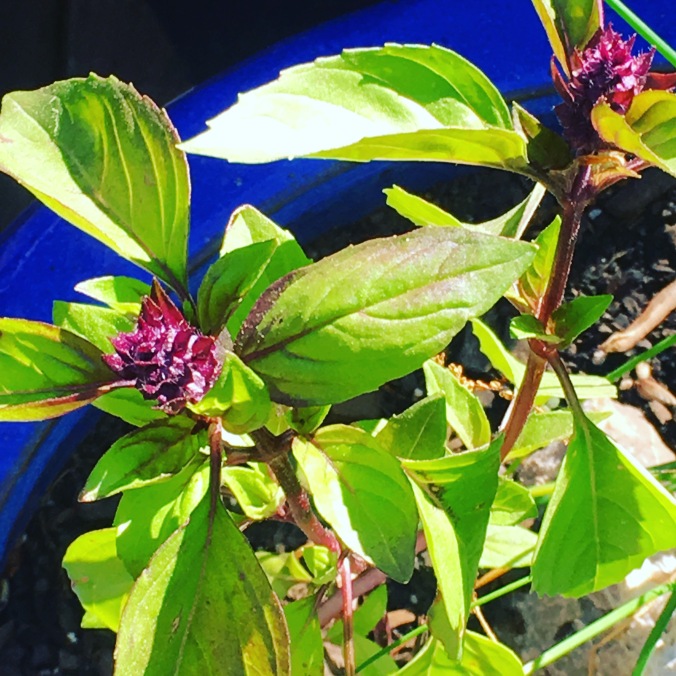
Above: Basil / Below: German Basil – the smells of cooking with your own fresh herbs is heavenly and heightens the flavors in your dish.
Tip: About once a week I trim the heads on my basil leaves down to just above the last two leaves on each stem and the plant grows even fuller. I put my cut leaves from my weekly pruning in an ice bath to clean and then pat dry with a paper towel.
Once your salmon is in the oven, grab a saucepan and put 2 cups of quinoa in it and add four cups of water. Bring to a boil then cover and reduce heat to medium heat. set timer for 15-minutes. Do not lift the lid off of it for the next 15 min!
While the quinoa is cooking, chop up your fresh green beans (you can save time by buying frozen green beans, too). Heat up a sauce pan with water and toss green beans in for about 10-15 min. Our green beans and salmon finished at about the same time.
When timer goes off for the quinoa, take a fork and make a hole in the center of your quinoa and see if there is any water at the bottom. If there’s no more water, kill the heat and season as desired. I added some chopped bits of parsley to mine from the garden as well as onion powder, garlic powder and some finely ground pink Himalayan salt.
Check the widest part of your salmon for doneness. The smaller more narrow end may cook faster so feel free to cut off that portion and return the rest to the oven for an additional five minutes if needed.
Serve all food nice and hot and pile on the greens. Your salmon portion size should be between 4-6 oz. – visually about the size of your cell phone. Your quinoa should be about 1/2 cup – visually about the size of a computer mouse.
Enjoy this healthy dinner and knowing that you are feeding your body healthy omega-3 fatty acids and gluten-free healthy eats. If you can eat salmon once a week, that is ideal to help your body fight inflammation.
Today’s dish is a result of me getting in the test kitchen sort of mood, as I decided to make lemon-aide from lemons you might say — or in this case, Fried Green Tomatoes from a “whoops” in the garden.
Five days ago, my husband and I were in the garden tending it and noticed that the Early Grow Tomato plant was very happy and becoming heavy-laden by four tomatoes it had produced on one vine. Our original support was just not doing the job and it needed something stronger to support the growing fruit. So, we tried adding a sturdier cage while gently lifting the vines. We were able to manipulate it in such a way that we felt confident the new structure was secure. He walked away satisfied, but no, I had to go give it one more little push into the ground. That’s when my ears heard a ***snnnnnap!!!*** and my heart dropped to my stomach. Sure enough, the stem that was heavy laden with four beautiful Early Grow Tomatoes had snapped at the base and was separated from the main plant. Ugh! I stared at my mishap. Double UGH! I thought.
So, I pulled the tomatoes off the broken vine and put the broken stem and leaf in my compost pile and hauled my four (very green) tomatoes up to the house sad that I had just spoiled my first crop in an aim to put that support in the ground perfectly. They sat on the counter all week as I didn’t have the heart to throw them out. No ripening, they just sat there, staring back at me and reminding me of my mishap. But then I got an idea… Remember that recipe that I used to coat chicken breast that my kids loved? What if we did a Southern thang’ and tried it on my green tomatoes?!
I sliced into those Early Grow (very green) tomatoes and they were beautiful. I gave them a bath in one whipped egg and coated them with my Gluten Free Breaded-but-without-bread Chicken Strips recipe. I backed off on the cayenne pepper by half and left out the turmeric (although it would be great in there as well.) And threw it in a hot pain sizzling with some bacon grease (my ghee wasn’t ready yet – ghee would be healthier, but the flavor was fantastic using the bacon grease.)
The first batch got a little burnt (see below pic), because I kept it on too high of heat (it was just above medium heat) for too long. The next batch turned out perf’ after I turned the heat to just below medium heat and then flipped the green tomato after about 40-seconds of grill time in my little sauce pan.
I only did a few at a time as they cook quickly.
Flip when the edges start turning light brown. I added a little bit of ranch on the side to balance out the spices in the Gluten Free Breaded-but-without-bread Chicken Strips recipe. My guys LOVED it! My picky 6-year-old and my sometimes picky 11 year-old both gave me two thumbs up! And their father came back for seconds! Whoop whoop!
Tomatoes have long been linked to heart health. Fresh tomatoes and tomato extracts have been shown to help lower total cholesterol, LDL cholesterol, and triglycerides. Tomatoes help in the regulation of fats in the blood — numerous phytonutrients in tomatoes have been shown to help prevent excessive clumping of our platelet cells. (This ability is usually referred to as an “antiaggregatory effect.”)
Tomatoes also have outstanding antioxidant content, including, of course, their oftentimes-rich concentration of lycopene. Research has shown that there is an important connection between lycopene, its antioxidant properties, and bone health. In a 4-week study of post-menopausal women, it was shown that those who did not consume lycopene-containing foods (like tomatoes) experienced increased signs of oxidative stress in their bones and unwanted changes in their bone tissue.
They are also very low on the glycemic index which means you can enjoy without worrying about a spike in your insulin levels.
And lastly, there have been some studies that show that tomatoes have anti-cancer benefits. As you know, in Polycystic Ovarian Syndrome (PCOS), there is a greater risk for Ovarian Cancer, so tomatoes may be beneficial.
One word to my PCOS Cysters — if you are experiencing severe joint pain and suffering from an arthritic condition, you may want to skip this snack/side dish idea. Joint pain can be caused by high uric acid in your body or because of arthritis. Night shades (which tomatoes are considered) are pro-inflammatory in some body types so you may want to check with your physician treating your arthritis before consuming this type of dish.
If you try making this recipe, I hope you share your pic and feedback in the comments below! Enjoy! (PS: Maybe even watch the movie “Fried Green Tomatoes” while eating this! Ha!)
TOOLS:
• Cutting Board and Knife
• Frying Pan
• Spatula for flipping fried green tomatoes
• small open bowl large enough to place tomato into for egg bath
• small open bowl large enough to place tomato into for coating mix
INSTRUCTIONS:
1. Heat your frying pan at just below medium heat.
2. Slice green tomatoes to about 1/8″ to 1/4″ thick.
3. Whip one egg in a small open bowl that is large enough to place a tomato into the egg bath coating both sides of the tomato with raw egg.
4. Move green tomato immediately into the gluten-free coating mix and coat both sides of the green tomato with gluten-free coating mix.
5. Add a ½ tsp of bacon grease to the hot pan (make sure the pan isn’t too hot or it will splatter). It should melt quickly. You want to move the pan so that the bacon grease coats the entire bottom of the pan.
6. Add your green tomato coated with the egg batter and gluten-free coating mix into the pan.
7. Allow your green tomato to cook in the pan for about a minute. The edges will turn a light-brown. Flip and cook for about the same time on the other side.
8. Remove from heat and serve with a little bit of ranch dressing (optional).
This recipe is refined-sugar free, gluten-free, corn-free, and lactose-free.
My Kindergartner has been a trouper coming off of gluten, sugar, dairy, and corn. I didn’t realize how much he relied on foods that had a higher insulin response until I changed what we ate. So I made tonight’s dinner with my littles in mind. As I stared at my chicken thawing out on the counter I wondered, “What should I do with this chicken tonight?” And then I thought, something “breaded” but not breaded as a treat for the kids.
Tip: When I make almond milk, I take the left over almond bits and dry them on a sheet rack on a piece of parchment paper for several days. When the almond bits are good and dry, I run them thru my Cuisanart to make “flour” out of my almonds and then I store it in an airtight container for such an occasion as this. I share all that, not to burden you with more tasks, but to help you realize how when you make almond milk, you can also use the bits that are not utilized in almond milk for other things — like this great lunch or dinner! If you are short on time, a package of almond flour works perfectly fine, too!
I like to cut the chicken into strips when it is still slightly frozen in the center. It holds it shape and you just slice right thru it easy peasy. Try and cut your chicken fingers into equally-sized strips so they will cook uniformly. The sweet potato fries were from the freezer section at our grocery store and took about the same time it took to cook the chicken strips. If you don’t want your chicken strips a yellow-tinge, just skip the tumeric in your coating mix. I added it, because I like to sneak in beneficial herbs, spices (and even some iodine with the kelp) where possible. Every little bit helps as you change your life for the better, one bite at a time.
Note: If you want to make this dairy-free, just skip the parmesan cheese and add a 1/2 cup of almond flour.
Main Ingredient:
• 7 pcs Chicken breasts, skinless (frozen)
Egg Bath:
• 2 Eggs
Other kitchen tools:
• Bowl for egg bath
• Larger bowl for coating mix
• Cookie sheet
• Parchment baking paper
• Tongs
DIRECTIONS:
1. You’ll want to cut your chicken into strips when it is thawed on the outside and still slightly frozen (not rock solid but partly thawed) in the center. It will cut easily and clean thru. Try and keep pieces uniform in size so that they cook at equal rates.
2. Take 2 eggs and whip them in a bowl and set aside.
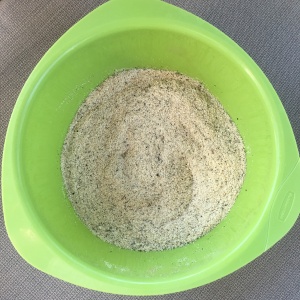
3. In another larger bowl, combine all the ingredients for the coating mix and combine well with a whisk until everything looks incorporated.
4. Finally, take your cooking sheet and line it with parchment paper.
5. Preheat oven to 425 degrees F.
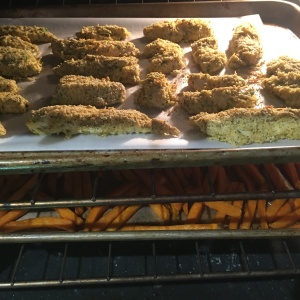
6. Create an assembly line order, left to right, with your chicken strips near your egg bath. Your coating mix next to the egg bath. And finally, your cookie sheet lined with parchment paper next to the coating mix.
7. Using a set on tongs, pick up several strips of cut raw chicken and put them into the egg bath. One-by-one, coat each piece of raw chicken with raw egg and transfer into the coating mix. Coat entire strip of chicken and using the tongs, transfer the coated chicken to the cookie sheet lined with parchment paper. Continue process, leaving space between each chicken finger until cookie sheet is full.
8. Place in heated oven and set timer for 20-25 minutes or until fully cooked.
9. Remove from heat and serve with your choice of sides (like sweet potato fries).
This recipe is refined-sugar free, gluten-free, and corn-free.
Today I did a Sam’s run and was thrilled to find that they were carrying a great Kale-Spinach-Swiss Chard-Carrot Medley Salad Mix. It made it a snap to toss this with some of the Pomegranate Chia Seed Dressing I purchased from Sams on my last trip along with some Pine Nuts and Feta cheese.
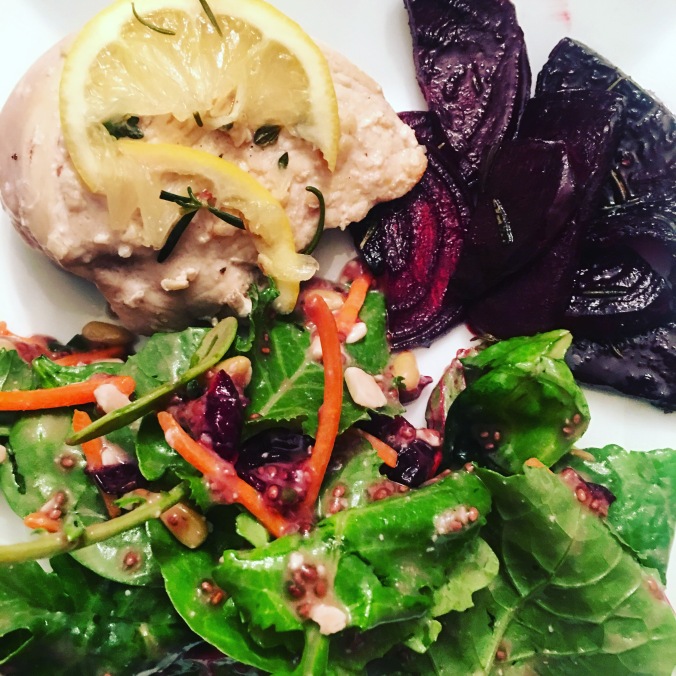
I also purchased a big ol’ bag of pretty yellow lemons and was itching to use them. So, decided to pair them with some chicken I had taken out earlier in the day to thaw out.
Tip: Fresh lemons are a great staple to have on hand. Not only do they make your copper shine, but squeeze a section of lemon into your ice water and you’ll help your liver flush out toxins and aid your body in digestion (not to mention get some Vitamin C.)
To keep the chicken from sticking to the skillet, I added some bacon grease to the pan as I turned on the heat and before I started to add any seasonings. From there, I added some fresh rosemary from the garden (this smells heavenly I might add y’all), and about 5-6 spoon full of minced garlic, freshly ground Himalayan salt, pepper, and squeezed lemon juice on top and added a slice of lemon to rest on the chicken while it cooked in the skillet under a aluminum foil canopy. I allowed this to cook at medium heat until the chicken breasts reached 165 degrees – 175 degrees internal temp.
A money-saving tip on buying chicken: Check out the freezer section at Sams or Costco and you’ll find it cheaper.
While the chicken was cooking away on the stop top, I added my sliced beets to the oven, lightly drizzled with some canola oil and salted it. I had some rosemary left over from the chicken so threw some on the beets, too. Why not?! 😉 The beets cooked at 350 degrees F. for about the same length of time as the chicken.
Did you know? Buy your beets with their leaves on them. Beet leaves are chock full of nutrients that you can chop up and add to your salad mix. As for the actual beetroot — it has a glycemic load of only 5, which is very low. Studies have shown that beetroots, or beetroot juice, can reduce blood pressure by up to 3-10 mm/Hg over a period of a few hours (21, 23, 24, 25).
The plating went fast. Just scooped up each chicken breast after checking that all were cooked completely, scooped up some beets, and some salad and — BOOM! Dinner served. My teenage boys ate it all up. They must have been hungry, because they raved at how good it was. My six year old ate everything, too except for the beets. And my three year old daughter only went for the chicken and a little bit of salad. She didn’t want to touch those beets.
Tip: Make extra beets and you can eat your broiled beets the next day on top of your salad. Yum!
INGREDIENTS:
• 5-7 skinless Chicken Breasts
• bacon fat (for skillet)
• 5-7 TBSP Garlic, minced
• 4-5 sprigs of Rosemary Leaves
• freshly ground Pink Himalayan Salt
• freshly ground Pepper
• Lemon Juice (enough to squeeze over each chicken breast)
• sliced Lemons (enough for each chicken breast)
Other things you will need:
• Aluminum Foil
• Large black skillet
• Tongs to remove from skillet
• Heat-resistant spoon to scoop seasonings from pan onto top of chicken as it cooks
• Meat thermometer to test internal temp of chicken for doneness
INSRUCTIONS:
1. Heat your skillet up on medium heat. Add bacon fat to the bottom of the skillet.
2. Add rosemary leaves (fresh), garlic (I use minced garlic from a jar and just store it in the fridge)
3. Add your chicken breasts.
4. Squeeze lemon juice over top of chicken and salt all chicken breasts. Place a lemon slice on top of each chicken breast.
5. Using aluminum foil, create a tent to allow the chicken to cook and to retain moisture in chicken.
6. Every so often, check the chicken for doneness and scoop up some of the seasonings and drizzle on top of each chicken breast. Replace aluminum foil tent until the internal temp reaches 165 -175 degrees.
7. Serve with roasted beets and salad medley or your choice of sides.
This recipe is refined-sugar free, gluten-free, corn-free, and lactose-free.


 You need approximately 7-10 cups of salad per day to fuel the cells in your body. And the heavier you are, the more greens you need per day to nourish your body. The good news is that salad is easy for your body to digest. One for lunch and one for dinner and you’ve nourished your body for the day.